1. Safety Test
The purpose is to protect the users’ safety and the properties of the users.
Prevent them from risks such as electric shock, fire and other hazards.
Meanwhile, every country has laws and regulations that define the safety standards of LED lights.
If a LED light does not meet the mandatory safety standards:
On the one hand, it may do harm to the user
On the other hand, it brings legal risks to the brand owners/distributors.
- Test Programs: Withstand test (Hi-Pot test), insulation resistance test, ground resistance test, etc
- Test equipment: Withstand tester, insulation tester, grounding resistance tester
- Applicable standards: GB7000.1/IEC60598/UL1598/UL153
Note:
1). Hi-Pot test is a destructive test, while insulation test and ground resistance test are non-destructive
2). Usually, we need 3 samples for each test.
Suppose you wish to purchase a series of 9w, 15w, 18w downlights from a factory.
Then we will need 3 samples for each wattage of them for the test safety.
3). Normally, we only do the insulation test and ground resistance test during a pre-shipment inspection.
This is because they are non-destructive.
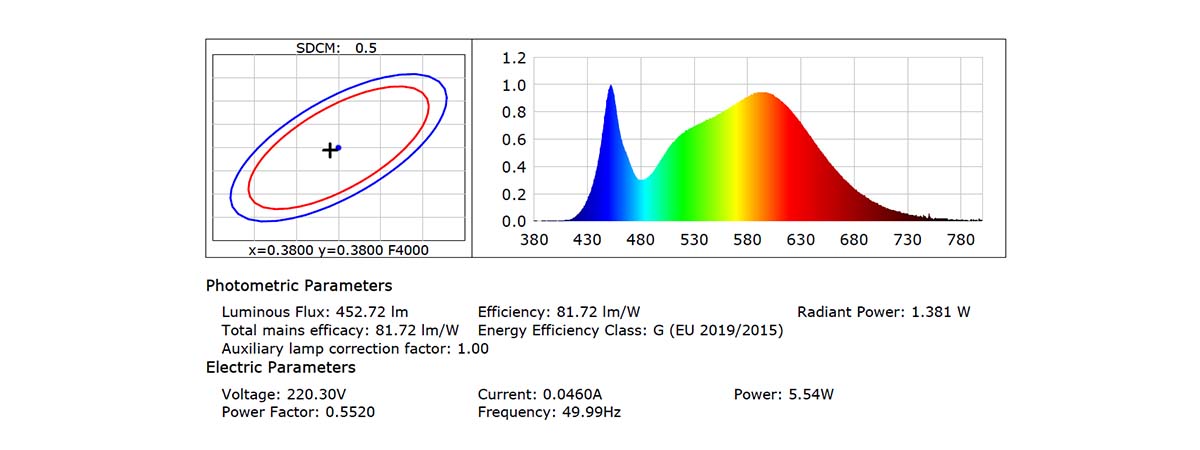
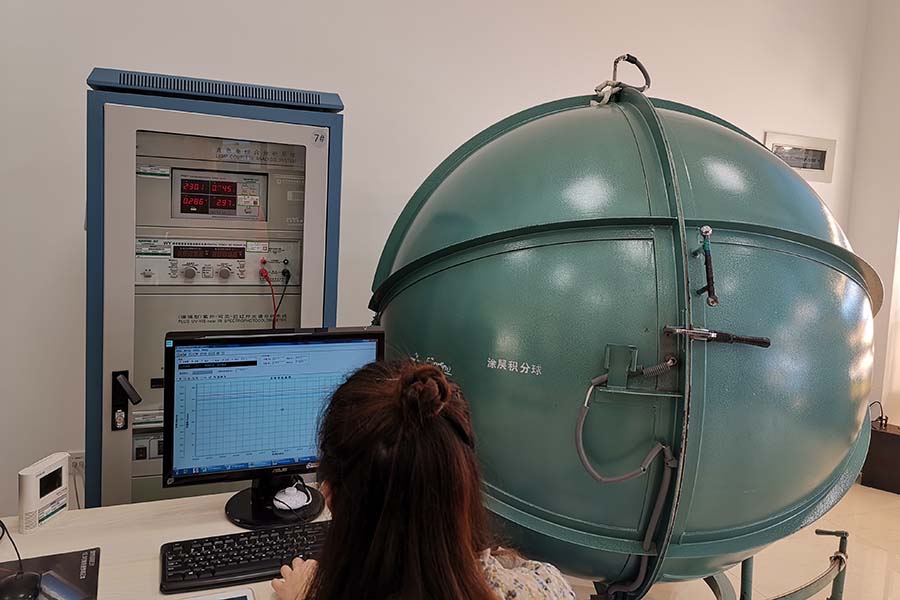
2. Spectrum Test
A LED light that can go on doesn’t equal a good LED light.
There are several essential parameters to define the quality of light.
They include color consistency, color rendering, color temperature and brightness.
And the purpose of this test is to verify whether their values are within the good/excellent ranges.
- Test Programs: Total Lumen, Lumen/Watt, CCT, Ra, R1 – R15, CRI, SDCM, Wave Length, etc.
- Test Instruments: Integrating sphere, spectrum tester, precision AC power supply, precision DC power supply
- Test standard: LM-79
Note:
1). Spectrum test is a non-destructive test.
Usually, we will need 3 samples per type for this test.
2). To get accurate data, it’d be better to preheat the samples in advance for 30 minutes at least.
3). Test time: this testing is fast, and can be finished within minutes
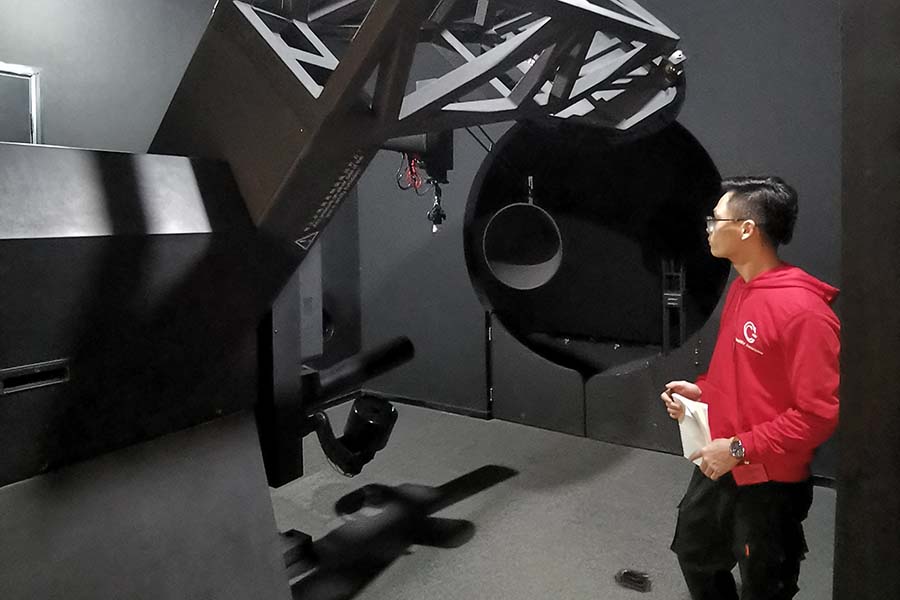
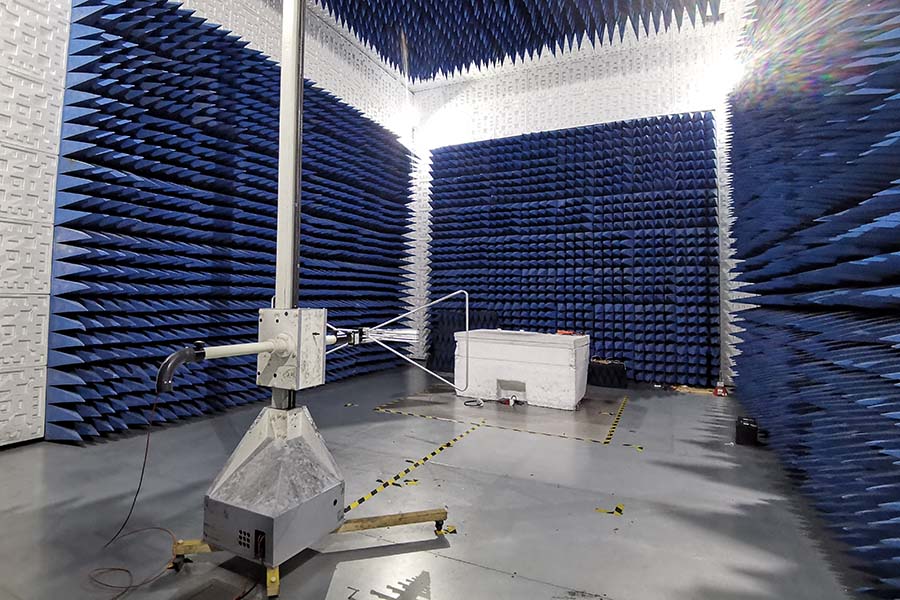
3. Light Distribution (IES test)
Light distribution is the projected pattern of light that a LED light will disperse onto a surface.
The light distribution from one manufacturer can be very different from another manufacturer.
You will need to verify the light distribution and efficiency of your LED lights.
And generate IES, LDT files to help lighting design.
- Test Programs: Total lumens, lumens/watt, UGR, beam angle, light intensity distribution map, light intensity.
- Test instruments: Light distribution performance test system, intelligent AC tester with special power supply, stabilized precision digital DC power supply, turntable controller, and dark room.
- Applicable standard: LM-79
Caution:
Both Spectrum Test and Light Distribution Test can test Total Lumen and Lumen/Watt.
However, the two are applicable for different types of LED lights.
If applied to the inappropriate type of LED lights, it will have a significant influence on the accuracy of the test results.
For this reason, it will be better to work with an experienced lab for such tests.
They know which test method is more appropriate, so won’t make mistakes.
Note:
1). IES test is a non-destructive test.
It needs long time for the test.
Normally, one factory has only one IES tester.
Usually, during the pre-shipment inspection, testing 1 sample per type will be enough.
If we want to verify the design, we will need 3 samples per type.
2). To get accurate data, it’d be better to preheat the samples in advance for at least 30 minutes.
3). Test time: 30 minutes – 1 hour
Note:
The waterproof performance also depends on the lifespan of materials and installation in the long run.
The lights may still have water inside due to material degradation or incorrect installation.
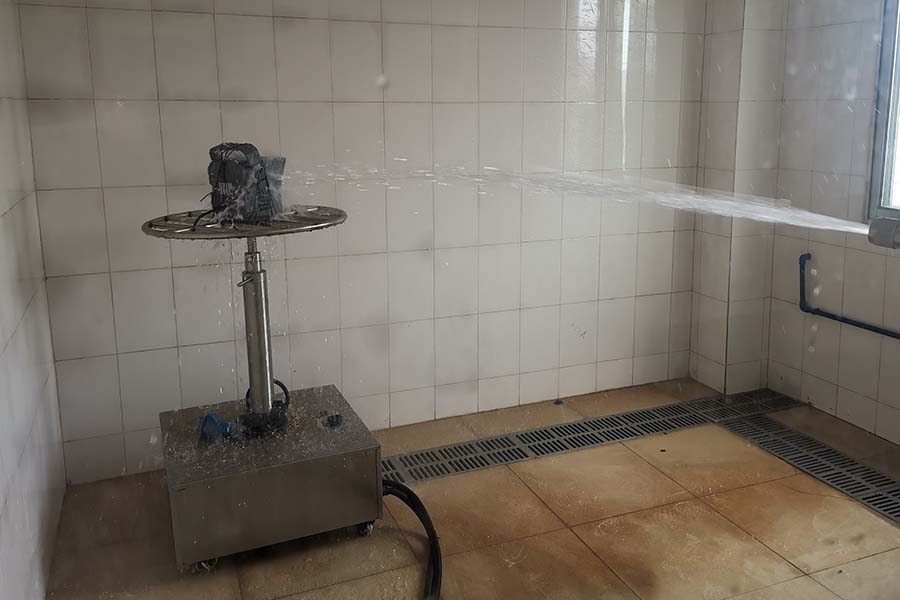
Test program:
For pre-shipment inspection, the most common test is waterproof.
To help you better understand, let me explain in plain English.
2.1). IP20: Not waterproof.
2.2). IPX4: Light rain, moderate rain.
Test method:
- Pendulum test with a water flow rate of 0.07L/min per hole, and lasts for 10 minutes
- Nozzle test with water flow of 10L/min, and also lasts for 10 minutes
2.3). IP65: heavy rain.
Test method:
- Spray water at the rate of 12.5L/min (about 30kN/㎡) for 15 minutes.
- Suppose a bottle of drinking mineral water is about 0.5L.
- That is to spray 25 bottles of them onto the light within a minute.
2.4). IP66: Torrential rain.
Test method:
- Spray water at a rate of 100L/min (about 100kN/㎡) onto the lights for 3 minutes.
- Suppose a bottle of drinking mineral water is about 0.5L.
- That is to spray 200 bottles of them onto the light (3 bottles per second) within a minute.
2.5). IP67: Submerged.
Test method:
- The light is submerged for 1 meter.
- And the top will be at least 150 mm below the water surface, and last for 30min.
- Test equipment: Waterproof test equipment or water tank.
Note:
1). We must preheat the samples for this test.
2). The timing, direction, and installation of test samples can have big difference for the results.
For this reason, we must be very careful about the details of test settings.
3). Usually, we need 3 samples for this test, no matter for a pre-shipment test or product development.
5. Lightning Testing and Surge Immunity Testing
Lightning can damage or even knock out some electronic products.
And the brightness of the lights will fluctuate when the voltage is unstable.
Good LED lights should have excellent protection against lightning and fluctuations in the power grids.
The purpose of this test is to verify whether the LED lights are still good under such extreme working conditions.
- Test program: Simulate different voltages and phases to the impact test of lights
- Test equipment: Lightning surge generator
- Test standard: GB/T17626.5-2019/IEC61000-4-5:2014
6. EMI Test (Electromagnetic Interference)
Some years ago, we can see the computer screen interfered with snowflakes or flickers if there happens to be an incoming phone call.
This issue is common for various electronic products.
The purpose of the EMI test is to avoid such mutual interference of the LED lights.
Make sure the lights won’t have negative visual issues in similar cases.
The smaller the external interference, the better.
- Test method: Conducted interference test and radiation interference test
- Test equipment: Electric wave dark room
- Test standard: EN55015
7. Vibration Test
All products have to be transported before they arrive in the hand of users.
No matter which transportation the LED lights take, there will always be vibration.
And we also need to make sure the lights are still good in other working environments where there is also vibration.
The purpose of this test is to evaluate the resistance of components and parts.
And the whole light is still good in the expected transportation and applications.
- Test program: Sine vibration and random vibration
- Test equipment: A vibration table that meets the test standards
- Test standard: IEC 60068-2-6:2007
- Test time: 30 minutes
8. Free Fall Test (Drop Test)
It refers to the free fall of a product after packing from a certain height.
The purpose is to evaluate its resistance to shocks of possible falls during transportation.
Positions to test include the package’s edges, corners, and surfaces.
- Test equipment: If it is possible, you can buy the drop test equipment.
- Otherwise, do it yourself according to the standard height.
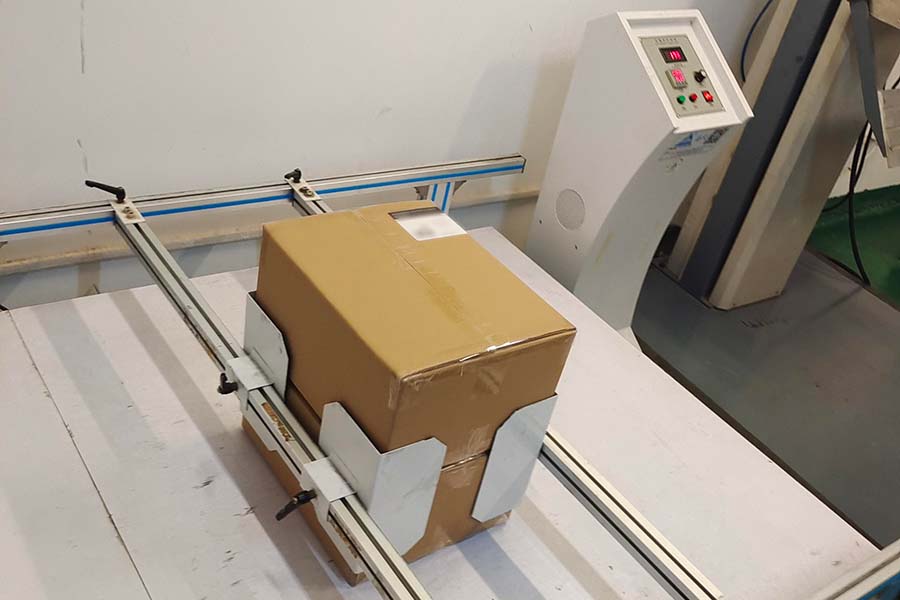
9. Tensile Test
LED lights need copper wires for the power supply.
You need to verify the wires won’t get loose and cause additional issues.
For example, the wires inside fall off, or water gets inside through the hole.
So, we do this test to check whether its anti-pull function fails.
The parts to test include the wire or flexible cable (check parts outside housings), and terminals.
- Test method:
- Test equipment: tensiometer
- Test standard: GB 7000.1-2015/IEC 60598-1:2014
10. Temperature Measurement Test
Thermal management is critical for the life span of LED lights.
Excessive heat can shorten their working hours dramatically.
Therefore, we have to measure the temperature at various points.
So, we will know whether there are potential issues due to excessive heat.
Test method:
- Power on the LED light for a certain period of time under a certain ambient temperature.
- And measure the maximum temperature of each key component of the LED light.
- Then estimate the life span of the light according to its specification and our experience.
In general, we will test these components:
- Driver’s housing, negative polar of the light source, IC, MOS tube, transformer, output capacitor, and CBB capacitor.
Test equipment:
- Thermal imager, Multiplex Temperature Tester
Test standard:
- GB 7000.1-2015/IEC 60598-1:2014
11. Reliability Test
Simulate long-time use or applications in harsh working environments.
Verify LED lights’ performance like stability, luminous flux maintenance rate, etc
- Test programs: 85℃+85 Humidity test, high-temperature test, low-temperature test, repeated ON/OFF test, high and low temperature impact test
- Test equipment: High-temperature box, high and low-temperature box
12. Production Process and Workmanship Inspection
Ensure that the structure and materials of the product comply with the standard or customer BOM requirements.
The points include soldering, heat dissipation process, wiring, driver brand, lightning protector brand, light source model, light body material, etc.
- Test method: Visual inspection
- Test time: Several minutes for normal lights (longer time for the lights with glue for sealing).